Fudgsicles

Summer is approaching, and with it comes the season of ice cream! I have to admit that ice cream is one of my favourite treats, and I do make an exception to my mainly vegan diet by indulging in the full dairy experience once in a while.

That being said, there are many kinds of vegan ice cream out there. I have tried a few non-dairy ones. Just recently I tried “Screamin’ Brothers” brand, which was quite tasty. Making your own is less expensive, and I believe I have found a gem of a recipe.

I haven’t talked about Plant Powered Families yet on this blog, but rather have been exploring dozens of recipes from it over the last five months. I’ve mentioned Dreena Burton before, who is a Canadian vegan blogger/writer who offers some of the best plant-based recipes I have ever come across. Plant Powered Families is a cookbook directed towards families to help them thrive on plant power. And, holy moly are there lots of great recipes. I have tried several dips, muffins, main dishes, and desserts, and many recipes have become regular rotations in my diet. At least once a month I make Dreena’s banana bread muffins to pack in my lunches. Other favourites include her chickpea salad sandwich filling, and her sweet potato chocolate cake. She also has a lot of good advice for how to eat plant based on a busy schedule, and tips on how to raise your kids on a plant-based diet.

This recipe for Fudsicles is simple, easy to make, and extraordinarily delicious. I’ve had it as a snack coming home from work on a hot day, or as a refreshing dessert.

Here is what I did:

Ingredients
1/2 cup cashew butter
1/4 cup raw sugar
3 tbsp cocoa powder
1/8 tsp salt
1/2 cup nondairy milk (I used coconut, but almond would be good too)
1/2 tsp vanilla extract
1 1/2 cups frozen banana chunks (I used 3 bananas)

I made my own cashew butter by blending 1/2 cup raw cashews until they were smooth. I added all the rest of the ingredients to my high-speed blender and blended the mixture until very smooth. I made sure there were no chunks of banana hidden in the mixture. Then, I poured it into a popsicle mold, put the sticks in, and popped it all in the freezer.

When I wanted to eat a popsicle I ran the mould under the tap until I could wiggle out a popsicle. Putting the whole mixture into a freezer-safe container would also work well, as the ice cream is soft enough. You’d just need to let the ice cream sit out for about five minutes to scoop it nicely.

20160508_195200

Everything I remember about a fudgesicle, but way healthier!

Chocolate Date Bars (Larabars)

Credit here goes to my good friend Katie, who showed me this recipe. She found it while browsing Pinterest, and the link for the original recipe is here. Katie kept raving about these Larabars, so I just had to try making them.

Larabars are a brand of fruit and nut bars that use natural ingredients and come in a variety of flavours. I have tried several of them, but not the peanutbutter chocolate chip ones because I am allergic to peanuts. With some modifications, I made a peanut-free version of these Larabars, inspired by Katie and the blog I mentioned above.

Ingredients
1 lb medjool dates (I get mine at Costco. I also only had 15, but the recipe called for 30)
1/2 cup raw or roasted almonds (no salt, preferably)
1 tbsp cocoa powder
1 tsp feaux peanut butter (I used Wow Butter. Another nut butter would work well too)
1 tsp coconut oil
1/3 cup vegan chocolate chips (ie. dark, no milk powder)

I put the almonds in a food processor and processed lightly, until the almonds crushed into small pieces. I took them out and put all the other ingredients except the chocolate chips into the food processor and food processed the mixture. (My tiny one-litre food processor couldn’t handle the dough, so when I make them again I will process the dough in smaller batches.) Lastly, I processed the mixture again with the chocolate chips added.

I formed the dough into a ball, placed it between two sheets of wax paper (parchment paper works too), and flattened the dough into a 1/2 inch-tall rectangle, using my finger tips (a rolling pin would work too). I refrigerated the dough for about an hour and then cut the dough into bars, around 3 inches by 1 1/2 inches. I wrapped the bars in small pieces of waxed paper and kept them in the fridge until I wanted to eat them.

20150325_171841These made an excellent snack for an extra boost of energy. I need all the energy I can get these days to get through my last three weeks of school!

Pumpkin Cupcakes with Macadamia Nut Frosting

Dreena Burton: she knows what’s up.

For years I have been searching for macadamia nuts that do not may contain peanuts, and last weekend my dad found some at Costco!! This is a happy moment; for those of you with food allergies, you get what I am talking about. So, I was finally able to make a recipe that I had on the backlog for months: Dreena Burton’s Vegan Pumpkin Cake and Fluffy Macadamia Mallow Frosting. For her thorough and delicious recipe complete with tips for modifications, go here. Burton is the author of “Let Them Eat Vegan” that is full of delicious vegan recipes for the whole family. I highly recommend it.

Here is my experience with the recipe.

I made my own macadamia nut butter by soaking the nuts in water and blending them into a butter with a food processor. I had to soak the nuts and rinse them well, as they were salted and roasted. Ideally I would have liked to buy actual macadamia nut butter, or make the butter from raw macadamias, but these things are hard to find peanut-free. I would have also liked to use a Vitamix, but I do not own one.

First thing to do is put a can of coconut milk in the fridge overnight, for the frosting.

Ingredients for the Cake
Dry Ingredients
2 1/4 cups flour (I used half millet flour and half white all-purpose)
1/2 cup, plus 2 tbsps, sugar
2 tsp baking powder
1/2 tsp baking soda
1/2 tsp salt
1 tsp cinnamon
1/4 tsp nutmeg
1/16 tsp ground cloves
(1/8 tsp allspice – I had to omit this because I did not have any)

Wet Ingredients
3/4 cups pumpkin puree
1 cup unsweetened non-dairy milk (I used soy)
1/4 cup maple syrup
1 tbsp lemon juice

1/4 cup neutral flavoured oil (I used melted coconut oil)

I preheated the oven to 350*F and greased 12 muffin tins (next time I will do 18, as the batter rose more than I expected it to. Cupcakes can be smaller because of the frosting on top that makes them larger).

In a large bowl I whisked together the dry ingredients. For optimal blending of the batter, they should be sifted, but I was lazy. If you do not sift dry ingredients in recipes, make sure that you whisk it well to ensure the lumps are out, and when incorporating the wet ingredients, ensure that there are not any lumps.

In a medium bowl I whisked together the wet ingredients, then added the wet mixture and the oil to the dry ingredients. I used a spatula to incorporate the ingredients together, scraping the bottom of the bowl to ensure everything blended. I filled the muffin tins with batter and baked them for 25 minutes, until a toothpick came out clean. This is how long it took for my cupcakes, as the tins were full, but with 18 instead of 12, I think it would take more like 18 minutes. When in doubt, set the timer for less time than you think, and check on them. I let the cupcakes cool completely before frosting them.

20150124_113415 20150124_113452

Ingredients for Frosting
1 can of coconut milk, refrigerated over night*
1/8 tsp salt
3/4 cup icing sugar
1 vanilla bean, seeded*
3 tbsp macadamia nut butter
1/2 tsp xanthan gum (found it at the health food store)

*note: I used a brand of coconut milk called Arayuma. I got it at the health food store, and it claims to be organic, fair trade, and preservative-free. 1% of the proceeds go to protecting Sri Lanka’s wild elephants. It was the cheapest coconut milk there, and I wanted to try a good-quality coconut milk. I have heard that canned coconut milk is not too good for you, but I am not exactly sure why. Anyway, I just wanted to try something new.

*note: cut vanilla bean length-wise and use a knife to scrape out the dark paste inside. You can use 1 tsp vanilla extract if you don’t want to use vanilla bean.

To make the frosting, first off, I scooped out the fatty part of the coconut milk, making sure to leave behind all the coconut water. The fat is much more solid than I was expecting, and took up about 2/3 of the can. I placed the coconut fat into a large bowl and whipped it with an electric mixer for about a minute to fluff it up. I added the salt, sugar, vanilla bean, and nut butter and slowly whipped it to incorporate, and added the xanthan gum last. I whipped the frosting for about two minutes until it was creamy. I put it in the fridge to let it solidify a bit more, leaving it in there for about 10 minutes.

Using a piping bag, I piped the frosting on the cupcakes. It would have been easy to just use a knife to spread it on the cupcakes, but I felt like they deserved a little more love than that, given how delicious they are.

20150124_123558

With the leftover coconut water, I plan on making a green smoothie and adding it to that. For the leftover pumpkin puree, check out this recipe of mine from a previous post.

Cranberry Pistachio Biscotti

Merry Christmas, everyone! I decided to give a crack at making my own vegan biscotti this holiday season. I haven’t had that much time to bake, but this recipe made a lot, so the cookie jar has been happy.

This recipe was inspired by a recipe in “Christmas Cookies: 50 Recipes to Treasure for the Holiday Season” by Lisa Zwirn. The cookbook was given to me last year by the owner of Life of Pie, where I was helping out with the Christmas madness during my break from school. This year I got to try out a recipe.

Ingredients
3 cups all-purpose flour
2 tsp baking powder
1/4 tsp cinnamon
1/2 cup coconut oil, softened
1/2 cup white sugar
1/4 cup brown sugar
3 tbsp chia seeds, plus 8 tbsp water
1 1/2 tsp vanilla extract
zest from 1 large orange
1 cup unsalted pistachios*
1 cup dried cranberries
An extra 1/4-1/2 cups water.

* If you use unsalted, add about 1/4 tsp salt to the dry ingredients. I had a hard time finding peanut-free unsalted pistachios, and had salted ones on hand, so I rinsed them thoroughly and omitted the salt. That worked pretty well.

I started by making a chia seed egg by letting the 8tbsp of water and chia seeds soak for five minutes. I preheated the oven to 350*F. Separately, in a medium bowl I mixed together the flour, baking powder, (salt), and cinnnamon. In a large bowl I used an electric mixer to cream the coconut oil, then beat in the sugars until fluffy. I then added the chia egg, vanilla, and orange zest. I mixed in the flour mixture little by little. Lastly, I stirred in the pistachios and cranberries.

Seeing that the original recipe used 2 large eggs, which have a lot of water in them, I noticed that my dough needed extra water. So, I added about 1/4-1/2 cup of water, little by little and stirring between each addition, until the dough was wet enough to gather into a ball. I made two balls of dough and placed them on a cookie sheet lined with parchment paper. I shaped each ball into a long rectangular shape, measuring 13 inches long by 2 1/2 inches wide. The loaves should be about 3 inches apart.

The loaves were baked for 30-35 minutes, and the pan was rotated at the half way point. I took the loaves out and let them sit for about 10 minutes, and lowered the oven temperature to 325*F. After 10 minutes, I transferred the loaves to a cutting board and used a bread knife to saw the loaves into 3/4 inch-thick pieces. I placed each piece back on the cookie sheet, facing the freshly cut sides down. I baked them for 10 minutes, then flipped each piece to the other freshly cut side, and baked them for 10 minutes more. They were taken out of the oven, and enjoyed in various ways: with hot chocolate, coffee, hazelnut spread, and just plain (as my mom would probably like them).

20141214_194302

This is a picture of the biscotti on a plate that I made my dad when I was a kid, and the cookie jar in the background. Santa’s head is the lid of the jar.

Merry Christmas! I wish everyone a safe, relaxing, and joyful holiday.

Ginger Cookies and Hot Chocolate

Brrr it is cold out there! January weather came early to Ottawa, and the winter coat and boots have been deployed. I find the best way to cope with the early winter is by being as warm and cozy as possible. That is why I made ginger cookies and hot chocolate today. About a month ago I started to experiment with making my own nut milk. Along with getting some fresh-made milk, I use the leftover pulp to make flour, then use the flour in my baking. Kinda neat. I add vanilla protein powder to the milk when having it with cereal to add some protein, too. I have made almond milk/flour, but for this recipe I made used pecans.

Last week I had lunch with my childhood piano teacher, whom I had not seen in about four years. It was lovely; we caught up over a delicious lunch that she made herself. For dessert she had a ginger-snap vanilla gelato from Stella Luna, a fantastic cafe in Old Ottawa South. Unfortunately, I could not eat it because they also make gelato with peanuts. Silly peanut allergy. Ever since that day I have been craving ginger cookies. So, I am kicking off the weekend with a cozy treat.

Here is the recipe for the ginger cookies, inspired by a recipe on food.com

Dry Ingredients
2 cups flour (I used 1 1/2 cups whole wheat, 1/2 cup white)
1 tsp baking soda
1/4 tsp salt
1 tsp freshly grated ginger
1/2 tsp cinnamon
1/2 tsp ground cloves

Wet Ingredients
1/2 cup coconut oil, melted
1/4 cup non-dairy milk (I used soy milk, but the pecan milk would have been delightful)
3/4 cup sugar
1 tsp vanilla

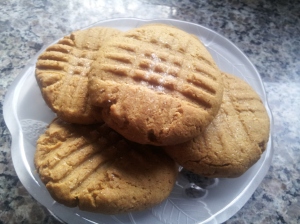
In a medium bowl I mixed together the dry ingredients with a wooden spoon, and in a small bowl I mixed together the wet ingredients with a whisk. I used the spoon to stir the wet ingredients into the dry ingredients, and mixed until combined. I then divided the dough into 12 balls, about 1 tbsp each, rolling them in my hands and placing them on a cookie sheet that was lined with parchment paper. I flattened the balls with my hand, then marked each cookie with a fork, in a criss-cross pattern. The cookies were baked at 350*F for 10 minutes. My cookies were soft, but for crispier ones, I could have flattened them even more, and used less dough for each cookie.

20141121_150828

Here is the recipe for the hot chocolate, inspired by a recipe for hot chocolate in The Essential Vegetarian Cookbook.

Ingredients for the pecan milk
2 cups pecans
4 cups water

Ingredients for the hot chocolate
2  heaping tbsp cocoa powder
2 heaping tbsp white sugar (plus more to taste)
1/4 cup water
2 cups pecan milk
pinch salt

I combined the pecans and water in a bowl and let them soak for ten hours. This is to make the pecans really soft. I blended the mixture in a blender on high speed for about two minutes. Then, I drained the liquid with a cheese cloth, squeezing the contents until as much liquid as possible came out. I reserved the pecan pulp in a container for later*

To make the hot chocolate, I whisked the cocoa powder, salt, sugar, and water in a small sauce pan. I heated the mixture until it simmered, whisking constantly. I added the pecan milk and continued to whisk until the hot chocolate came to a boil. I served it immediately.

20141121_211517

The hot chocolate was quite chocolatey, and had a distinct flavour of pecan. I enjoyed a cup of it with the ginger cookies, and shared it all with my dad. I definitely would put a bit of maple syrup next time to make it just a hint sweeter.

*To make nut flour, all I do is lay the pulp left over from the nut milk on a baking tray, making sure the pulp is in a thin layer, and bake it until it is dry and powdery. I think I baked it at 200*F for about 45 minutes to an hour. I kept it in an air-tight container in the cupboard and have used it to make granola bars, muffins, and almond cream. Just be careful, as it does not substitute perfectly for flour. I would use only some of it to substitute all-purpose flour in a recipe.