Fudgsicles

Summer is approaching, and with it comes the season of ice cream! I have to admit that ice cream is one of my favourite treats, and I do make an exception to my mainly vegan diet by indulging in the full dairy experience once in a while.

That being said, there are many kinds of vegan ice cream out there. I have tried a few non-dairy ones. Just recently I tried “Screamin’ Brothers” brand, which was quite tasty. Making your own is less expensive, and I believe I have found a gem of a recipe.

I haven’t talked about Plant Powered Families yet on this blog, but rather have been exploring dozens of recipes from it over the last five months. I’ve mentioned Dreena Burton before, who is a Canadian vegan blogger/writer who offers some of the best plant-based recipes I have ever come across. Plant Powered Families is a cookbook directed towards families to help them thrive on plant power. And, holy moly are there lots of great recipes. I have tried several dips, muffins, main dishes, and desserts, and many recipes have become regular rotations in my diet. At least once a month I make Dreena’s banana bread muffins to pack in my lunches. Other favourites include her chickpea salad sandwich filling, and her sweet potato chocolate cake. She also has a lot of good advice for how to eat plant based on a busy schedule, and tips on how to raise your kids on a plant-based diet.

This recipe for Fudsicles is simple, easy to make, and extraordinarily delicious. I’ve had it as a snack coming home from work on a hot day, or as a refreshing dessert.

Here is what I did:

Ingredients
1/2 cup cashew butter
1/4 cup raw sugar
3 tbsp cocoa powder
1/8 tsp salt
1/2 cup nondairy milk (I used coconut, but almond would be good too)
1/2 tsp vanilla extract
1 1/2 cups frozen banana chunks (I used 3 bananas)

I made my own cashew butter by blending 1/2 cup raw cashews until they were smooth. I added all the rest of the ingredients to my high-speed blender and blended the mixture until very smooth. I made sure there were no chunks of banana hidden in the mixture. Then, I poured it into a popsicle mold, put the sticks in, and popped it all in the freezer.

When I wanted to eat a popsicle I ran the mould under the tap until I could wiggle out a popsicle. Putting the whole mixture into a freezer-safe container would also work well, as the ice cream is soft enough. You’d just need to let the ice cream sit out for about five minutes to scoop it nicely.

20160508_195200

Everything I remember about a fudgesicle, but way healthier!
Madeleines

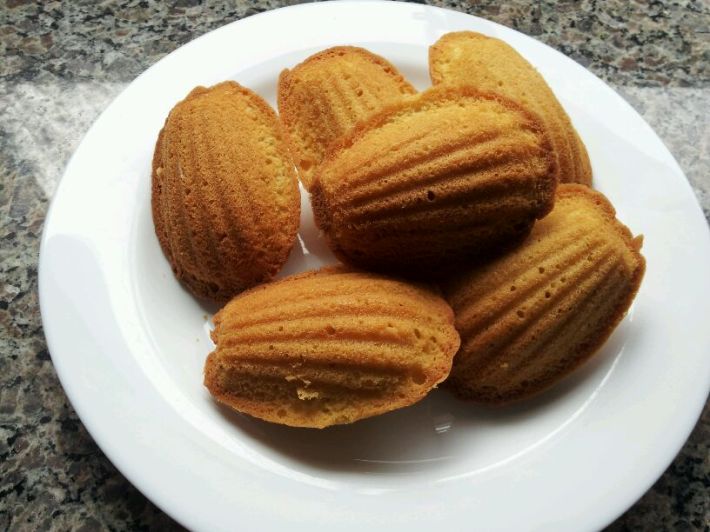
At Cordon Bleu I learned how to make these lemon cookie-cake things in the shape of a shell, also known as Madeleines. They were originally made in Commercy, France, and were inspired by sponge cake (aka Genoise). For Christmas this past year, I asked for a Madeleine pan, and at long last I found a chance to use it! At LCBO (Le Cordon Bleu Ottawa), the French chefs insist that Madeleines are presented with the shell side facing down. This just doesn’t make sense to me, as the nice pattern just goes to waste. As such, any French pastry chef out there might think the Madeleines below are upside down.  

Image

Ingredients
130g sugar
2 eggs
35ml milk
170g flour
8g baking powder
85g butter
zest of one lemon or one orange (I used lemon)

I sifted together the flour and baking powder, then in a separate bowl whisked the sugar, lemon zest, and eggs together vigorously until they turned a light colour. 

Meanwhile, in a small pot, I made beurre au noisette. This involves boiling the butter until brown specks appear in it. I removed the pot from the heat as soon as I saw this happen. 

With a whisk, I mixed the flour mixture with the egg mixture, then added the milk, then the butter. I covered the bowl in plastic wrap, and refrigerated the batter for an hour. This allows the flour time to absorb the liquid. 

Image

I buttered the Madeleine pan well, and spooned the batter into each shell, about half-full (I think I over-filled mine just a tad). They baked at 370 degrees Fahrenheit until golden brown (about 15 minutes, turning the tray half-way through). 

ImageThis is a very simple recipe to make, and there is a lot of potential for experimenting with the ingredients. You can dip them in chocolate, use any kind of zest you want, add cinnamon, or replace 10% of the flour with cocoa powder, for example. Now I want to make more and try this! Too bad I’m out of eggs. 

Oh, and happy pi day! I would have made pie today if I hadn’t spent 8 hours yesterday making pie at work, in preparation for today. For those of you who don’t know, today is March 14th, or 3/14, which is sort of like 3.14, which is pi (the amount of times the diametre of a circle fits around its circumference). For math geeks and pie lovers, this is a special day. I am more of the latter, but I did like math in school, so maybe I’m a bit of both!

Vanilla Whoopie Pies

Here is a pastry you do not come across home-made very often: whoopie pies. They are similar to cupcakes, but rather than the frosting on top, it is sandwiched between two pieces of cake, and the cake has the consistency of a soft cookie and a cake combined. In my opinion, they are heavenly. While at work yesterday, there was an opportunity to experiment with a recipe, so I chose to make Vanilla Dream whoopie pies from the cookbook Whoopie Pies by Hannah Miles. 

20130308_165055

Ingredients

1/2 cup butter, softened
1 cup sugar
1 egg
1 tsp vanilla extract
2 1/2 cups self-rising flour (I used regular flour, plus 1 tbsp baking powder and 1/2 tsp salt)
1 tsp baking powder
1/2 tsp salt
1/2 cup buttermilk
1/2 cup sour cream
1/3 cup hot water (not boiling)

I greased two whoopie pie pans (it should be 24 cavities in total, making 12 pies. I originally thought that each cake would get cut in half, so I ended up filling 18 cavities), and set them aside. Using an electric mixer, I creamed the butter and sugar together until fluffy, then added the egg and vanilla and beat the mixture some more. Then, I added the dry ingredients with the buttermilk and sour cream and blended until just combined. I finished by adding the hot water. Next, I scooped the batter into the prepared pans, and left them to stand for 10 minutes. Then, I baked the cakes for 10-12 minutes at 350 degrees Fahrenheit.

For the vanilla butter cream, I used a batch of vanilla frosting that was already made, but here is the recipe from the book.

Ingredients

1/2 cup softened butter
3 cups icing sugar
1 tsp vanilla extract
3 tbsp milk
(optional 4 tbsp raspberry preserve)

Cream the butter until light and fluffy, then add icing sugar little by little. Add the milk and vanilla and whip until smooth.

Once the cakes were removed from the oven, I let them sit for about ten minutes, then carefully unmolded them. I let them cool completely, then piped the frosting on top of half of them, and lidded them with another cake. I finished them off by sifting some icing sugar on top. The recipe also directed to put some raspberry preserve on top of the frosting, but we did not have any at work.

What I loved about the whoopie pies was that with each bite there was a perfect balance of cake and frosting, unlike cupcakes, in which you can get a mouthful of just icing, or a mouthful of just cake. I also found the cake to be lighter than a cupcake, but maybe this would be different if I had actually used self-rising flour. Overall, it was fun to make, and it was even more exciting when all but one sold within an hour and a half!

As the days get closer and closer to my departure to Argentina, I am unsure about how much more I will get to post about recipes I make until after I get back. I plan on posting about my trip, so this could temporarily turn into a travel blog about growing vegetables. I will also most certainly post about the food I am eating.