Dehydrated Goodies: Powdered Veggie Stock and Date-Nut Chewies

Merry Christmas!

December can be such a busy month! I’ve been juggling two jobs while squeezing in time for getting into the holiday spirit and getting my Christmas shopping done. This year I bought my gifts with a theme in mind: hand-made and local. I bought lots of gifts at Market Collective, which is a fun event in Calgary that hosts local artists selling their creations. I also decided to make a couple things in my dehydrator, and I’d like to share them with you today.

I got these recipes from a book called Dry It – You’ll Like it! by Gen Macmaniman. I received it for Christmas one year, and it is a great guide for drying fruits, veggies, and herbs, and includes instructions for building your own dehydrator.

Dehydrating is fun, and a great way to save produce that is in season, or that may go bad before you have a chance to use it fresh. At Thanksgiving I dehydrated all the extra fresh herbs I had: sage, parsley, and thyme. I also made cran-apple fruit leather, and go absolutely cuckoo for dehydrated apples and bananas. In my opinion, having a dehydrator is perfect for anybody who likes experimenting in the kitchen, and who is looking to incorporate more raw foods in their diet. Check out this recipe for rosemary seed crackers from a previous post.

Please note that if you are considering buying a dehydrator, look at product reviews before purchasing, as the first one I had lasted only a month past the warranty date, and it looks like I’m not the only one that happened to. It’s also great to buy a dehydrator that you can control the temperature.

So, back to my little Christmas project. I made soup stock and date-nut chewies to include in my gifts to my family. Here is what I did:

Veggie Soup Stock
Yields around 20 tablespoons of powder, or 20 cups of stock (when added to 1 cup of boiling water per 1 tablespoons of stock)

Ingredients
2 medium tomatoes, sliced
4 celery stalks, cut into sticks (I also dehydrated the leaves)
2 cups mushrooms, sliced
2 large carrots, sliced into rounds
1/2 cup spinach

Note: You may use a wide variety of vegetables. The book suggests cabbage, carrots, celery, garlic, green beans, horseradish, mushrooms, mustard greens, onions, peppers, spinach, tomato, or watercress. I chose what I thought would go together nicely.

Directions
I placed all the vegetables in one layer on dehydrator sheets. I have four sheets, and all these veggies took two rounds of dehydrating to complete. They were dehydrated at 135*F for about 6 hours. Time may vary depending on how thick the vegetables are, how crowded the trays are, and how juicy the vegetables were to begin with. I removed the vegetables that felt completely dry, and continued to dehydrate the ones that were still damp. You can add more vegetables once there is room on the trays. To check the vegetables, remove the heat source and let the veggies cool down first. If it feels dry, it probably is.

Next, I placed all the dehydrated vegetables in a high-speed blender and blended until the vegetables were a powder. This took a couple minutes of blending. Be sure to let the blender rest before opening it, as the powder is very fine and smokes into the air.

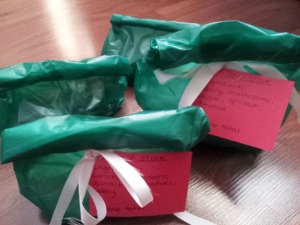
I divided the stock into two plastic baggies of 10 tbsp each, and added the keep-dry packets that come with sushi and other dry foods. I didn’t want the stock powder to be exposed to any moisture.

I wrote the following instructions on each baggie: “Mix 1-2 tbsp of stock with 1 cup of boiling water and let rest for about a minute. Add ground flaxseed to thicken, if desired. Use in soups, stews, and gravy.”

20151216_122650

Voila! Home-made powdered vegetable stock! Because it’s dry, it’ll last for a long time. Store it away from sunlight and moisture.

Date-Nut Chewies
Ingredients
3/4 cup oil (I used canola oil)
1/2 cup maple syrup
3 Macintosh apples (or another kind of apple), cut into pieces, skin on
2 tsp vanilla extract
1 cup rolled oats
1/3 cup sunflower seeds
2 cups pitted dates
1 cup raw almonds (recipe called for walnuts)

In my high-speed blender I mixed the oil, maple syrup, apples, and vanilla extract until smooth. Then, I added the rest of the ingredients and blended until smooth. The original recipe indicates that you should use ground oats and sunflower seeds, but I did not do this because of how powerful my blender is. Plus, I thought some chunks would be OK.

Next, I spread the mixture out on two dehydrator sheets, making them pretty thick (about 1/2 inch). I dehydrated them for around 6 hours, then cut them into small squares, separated them from each other, and continued to dry them for another 8 hours.

These chewies are a great snack that resembles an energy ball. I was expecting it to be more candy-like or cookie-like, but it definitely tastes like a healthy snack. The first one I tried, in all honesty, I wasn’t sure if I should give them as gifts, but after having a few more, the taste grew on me. This recipe made a lot, so I’m glad they turned out!
20151216_122802 (3)

Raw Zucchini Lasagna

A special shout out goes to my Auntie Anne, who sent me a cookbook in the mail called Eat Raw, Eat Well by Douglas McNish. It was a lovely surprise to get this cookbook, as I did not know she was sending it, and I had never heard of the book. The recipes look absolutely delicious, and I finally made one. It’s called Layered Zucchini Lasagna in the book, and I made it with some slight variations. The biggest changes I made were in quantities (I halved most of the sauces), and I added or changed ingredients here and there. Here is what I did.

Ingredients for Cashew Ricotta Cheese
2 cups raw cashews, soaked for 30 minutes
Juice from 1/2 lemon
1/2 yellow or red pepper (I used yellow)
1/2 cup water
1 clove garlic, minced
3/4 tsp dill weed
1 tbsp nutritional yeast
1/2 tsp salt

Ingredients for Marinara Sauce
2 tomatoes, quartered and seeded (push out the excess liquid and seeds)
2 tbsp olive oil
1/2 tsp salt
1/4 cup fresh basil
1/2 tsp cayenne powder
1 tbsp chia seeds

Ingredients for Pesto
1/8 cup lemon juice
1 clove garlic, minced
1/2 tsp salt
pepper
1/2 cup fresh basil
1 cup spinach
1/4 cup raw walnuts
1/8 cup flax oil (or olive oil)

Ingredients for Parmesan Cheese
Handful of raw almonds
3 tbsp nutritional yeast

Ingredients for Assembling the Lasagna
2 medium-sized zucchini
1 tbsp olive oil
salt and pepper

This whole dish requires a good food processor or a Vitamix. A tip I have is to add ingredients one by one so that the blending is easy. I always started with garlic and liquid, and ended with the most solid ingredient. This all depends on how good one’s mixer is.

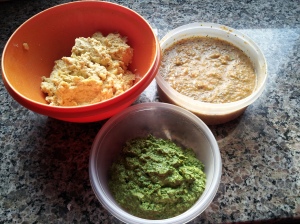
First, I made the cashew cheese by blending all the ingredients (reserving half of the cashews) in a food processor until smooth,. I added the rest of the cashews last and blended again. I did this to have some of the cashews remain chunky. I reserved the cheese in a container and put it in the fridge.

Next, I made the marinara sauce by blending all of the ingredients, except the chia seeds, in the food processor. I stirred in the chia seeds last. I reserved the sauce in a container and put it in the fridge.

Then I made the pesto. I blended all the ingredients, except the flax oil, all at once in the food processor. I added the flax oil little by little and blended until smooth.I put the pesto in a container and reserved it in the fridge.

20150308_155911

The parmesan cheese is even easier. I pulsed the almonds and nutritional yeast in a food processor until the almonds became a chunky meal. It is important not to over-blend, as the almonds can start to turn into a butter.

To assemble the lasagna, I used a mandolin (thanks to Tom for that birthday gift) to cut the zucchinis length-wise, very thin. I made about 9 sliced. I lay out a piece of parchment paper and drizzled olive oil on top, then put the sliced zucchini on top and drizzled some more olive oil. I wanted the zucchini to be lightly coated, not soaked. I put salt and pepper on top and let them sit for ten minutes.

20150308_175317

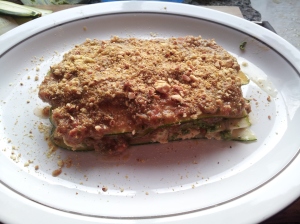
Next, I placed three pieces of sliced zucchini on a large dish, side by side. I layered the ricotta cheese, pesto, and marinara sauce, in that order. The cheese took a bit of time to spread without moving the zucchini. I then layered three more pieces of zucchini on top, repeated the layer of sauces, then topped the lasagna with a final layer of zucchini. I added an extra layer of marinara sauce on top, and sprinkled a generous coating of the parmesan cheese on top. I let the lasagna sit for about an hour before eating, which lets the noodles soften and allows the flavours incorporate.

20150308_180902

Voila! I was pleasantly surprised with this recipe. It was delicious and full of flavour. I noticed that water starts to come out of it after an hour, and even more so when eaten as leftovers. It’s probably better made fresh, but we’ll see tomorrow!

20150308_180934

Chickpea Curry

I originally tasted this curry recipe when my friend Kristy Benz made it back when we lived together during spring school at Bishop’s [insert nostalgic moment]. It turned out that not only did I own the same cookbook with the recipe for that curry, but I used to be obsessed with it back when I was a pre-teen vegetarian. The thing that is so great about the cookbook is that it has pictures of the dishes, allowing your eyes to decide what looks good. It also has recipes varying in difficulty, making it a really useful book for any cook. It is called The Essential Vegetarian Cookbook, and many of the recipes just so happen to be vegan.

My dad had a pot luck at work this past week, and asked me to make a casserole of some sort. I opted for this chickpea curry, and served it on top of a bed of rice, but the recipe claims that it is also delicious inside of a wrap. It could make a good main dish, or a side dish. Also keep in mind that this recipe is saucier than it looks!

Ingredients
2 onions
4 cloves garlic
1 tbsp oil (I used a bit more)
1 tsp chilli powder
1 tsp salt
1 tsp tumeric
1 tsp paprika
1 tbsp cumin
1 tbsp coriander
2 cans chickpeas, drained and rinsed
1 can crushed or diced tomatoes
1 tsp garam masala

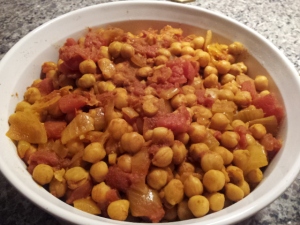
I chopped the onions into small pieces, and peeled and crushed the garlic. Meanwhile, a pan was heating with the oil in it, and I sauteed the onions and garlic until they were clear and tender. I added all the spices, except for the garam masala, and let the mixture cook for one minute. I added the chickpeas and the tomatoes and gave the pot a big stir to combine all the ingredients. Covering the pot, an stirring occasionally, it simmered on low heat for 20 minutes, until the chickpeas were soft. Lastly, I added the garam masala and let the curry cook for another 10 minutes.

Curry without a worry.

20131001_211044

Tomato Cake Experiment

Over the summer I read a lot of articles in the Globe and Mail’s Food section, and one day I came across an article claiming that tomatoes are delicious in desserts. Ever since, I have been curious about how a tomato cake would taste, and today at work I had time to bake something new. January is a bit of a slow month for bakeries, and at  Life of Pie we have the opportunity to explore with recipes if we have time. I found the recipe for tomato cake from from cdkitchen.com 

Image

Ingredients

1 cup sugar

2 tablespoons shortening

2 eggs

1 teaspoon baking powder

1 1/2 cup flour

1 teaspoon baking soda

1 can tomato soup

1 teaspoon ginger

1 teaspoon cinnamon

1 teaspoon cloves

1 cup raisins

1 cup nuts (I used chopped pecans)

Cream together the sugar, shortening, eggs, baking powder, and flour. Mix baking soda with tomato soup and add to mixture. Mix in spices, raisins and nuts. Pour into a square baking tray and bake at 325 degrees for 30 minutes. My cake was done in 15 minutes, probably because I used a large baking pan.

I iced the cake with a brown sugar icing. I mixed 3 tablespoons of milk, 3 tablespoons of butter, 1/2 cup brown sugar, and 1 1/2 cups icing sugar. Ice the cake when it has cooled down, and cut into squares.

In all, the cake tasted good. The tomato soup made it quite moist, and the flavours went well together. To be honest though, I think I had built it up in my mind and was expecting something ridiculously delicious. This recipe uses a can of tomato soup, so perhaps the outcome would be different using fresh tomatoes. I also think the cake could have used some salt – when cooking, my stepdad always tells me how much tomatoes need salt – and I was surprised that the recipe I found did not call for any. The cake was a teensy bit bland, and perhaps a 1/4-1/2 tsp of salt is all it would have needed to have more flavour. I also would have liked the cake better without raisins.

The verdict: this will not be the last time I bake with tomatoes – there is a lot more exploring to be done! Perhaps next, some tomato ice cream? In the mean time, if you happen to be in Ottawa and happen to be near old Ottawa south, stop by Life of Pie for a slice of tomato cake!