Dehydrated Goodies: Powdered Veggie Stock and Date-Nut Chewies

Merry Christmas!

December can be such a busy month! I’ve been juggling two jobs while squeezing in time for getting into the holiday spirit and getting my Christmas shopping done. This year I bought my gifts with a theme in mind: hand-made and local. I bought lots of gifts at Market Collective, which is a fun event in Calgary that hosts local artists selling their creations. I also decided to make a couple things in my dehydrator, and I’d like to share them with you today.

I got these recipes from a book called Dry It – You’ll Like it! by Gen Macmaniman. I received it for Christmas one year, and it is a great guide for drying fruits, veggies, and herbs, and includes instructions for building your own dehydrator.

Dehydrating is fun, and a great way to save produce that is in season, or that may go bad before you have a chance to use it fresh. At Thanksgiving I dehydrated all the extra fresh herbs I had: sage, parsley, and thyme. I also made cran-apple fruit leather, and go absolutely cuckoo for dehydrated apples and bananas. In my opinion, having a dehydrator is perfect for anybody who likes experimenting in the kitchen, and who is looking to incorporate more raw foods in their diet. Check out this recipe for rosemary seed crackers from a previous post.

Please note that if you are considering buying a dehydrator, look at product reviews before purchasing, as the first one I had lasted only a month past the warranty date, and it looks like I’m not the only one that happened to. It’s also great to buy a dehydrator that you can control the temperature.

So, back to my little Christmas project. I made soup stock and date-nut chewies to include in my gifts to my family. Here is what I did:

Veggie Soup Stock
Yields around 20 tablespoons of powder, or 20 cups of stock (when added to 1 cup of boiling water per 1 tablespoons of stock)

Ingredients
2 medium tomatoes, sliced
4 celery stalks, cut into sticks (I also dehydrated the leaves)
2 cups mushrooms, sliced
2 large carrots, sliced into rounds
1/2 cup spinach

Note: You may use a wide variety of vegetables. The book suggests cabbage, carrots, celery, garlic, green beans, horseradish, mushrooms, mustard greens, onions, peppers, spinach, tomato, or watercress. I chose what I thought would go together nicely.

Directions
I placed all the vegetables in one layer on dehydrator sheets. I have four sheets, and all these veggies took two rounds of dehydrating to complete. They were dehydrated at 135*F for about 6 hours. Time may vary depending on how thick the vegetables are, how crowded the trays are, and how juicy the vegetables were to begin with. I removed the vegetables that felt completely dry, and continued to dehydrate the ones that were still damp. You can add more vegetables once there is room on the trays. To check the vegetables, remove the heat source and let the veggies cool down first. If it feels dry, it probably is.

Next, I placed all the dehydrated vegetables in a high-speed blender and blended until the vegetables were a powder. This took a couple minutes of blending. Be sure to let the blender rest before opening it, as the powder is very fine and smokes into the air.

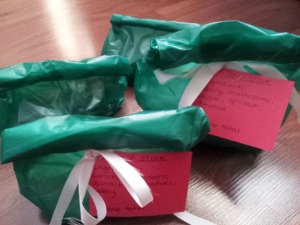
I divided the stock into two plastic baggies of 10 tbsp each, and added the keep-dry packets that come with sushi and other dry foods. I didn’t want the stock powder to be exposed to any moisture.

I wrote the following instructions on each baggie: “Mix 1-2 tbsp of stock with 1 cup of boiling water and let rest for about a minute. Add ground flaxseed to thicken, if desired. Use in soups, stews, and gravy.”

20151216_122650

Voila! Home-made powdered vegetable stock! Because it’s dry, it’ll last for a long time. Store it away from sunlight and moisture.

Date-Nut Chewies
Ingredients
3/4 cup oil (I used canola oil)
1/2 cup maple syrup
3 Macintosh apples (or another kind of apple), cut into pieces, skin on
2 tsp vanilla extract
1 cup rolled oats
1/3 cup sunflower seeds
2 cups pitted dates
1 cup raw almonds (recipe called for walnuts)

In my high-speed blender I mixed the oil, maple syrup, apples, and vanilla extract until smooth. Then, I added the rest of the ingredients and blended until smooth. The original recipe indicates that you should use ground oats and sunflower seeds, but I did not do this because of how powerful my blender is. Plus, I thought some chunks would be OK.

Next, I spread the mixture out on two dehydrator sheets, making them pretty thick (about 1/2 inch). I dehydrated them for around 6 hours, then cut them into small squares, separated them from each other, and continued to dry them for another 8 hours.

These chewies are a great snack that resembles an energy ball. I was expecting it to be more candy-like or cookie-like, but it definitely tastes like a healthy snack. The first one I tried, in all honesty, I wasn’t sure if I should give them as gifts, but after having a few more, the taste grew on me. This recipe made a lot, so I’m glad they turned out!
20151216_122802 (3)

Road Trip into the Utah Desert

Hello internet! Here is a post that I wrote on Monday, June 1st, that I could not post because I was in Maple Canyon with no cellphone or internet connection. Right now I am hanging out at Alchemy Cafe, in Salt Lake City, taking a rest day after climbing for the past three days. Here is what I wrote two days ago:

IMG_0030

Hello everyone! I am writing from my campsite in Maple Canyon, a climbing destination in Utah. Today is day five of the USA road trip that Tom and I have been planning for months. So far it has been a blast, and I wanted to recount a little bit of our adventures on this blog, as not only is this blog about sharing food, but also about sharing adventures. And, so far, this has been quite an adventure!

IMG_0055

Day 1, Tom and I left Canmore, Alberta and drove south to a campsite just outside of Anaconda, Montana. We slept in our car that night for simplicity sake, and packed up early the next day to head out to Ogden, Utah. The drive was incredible, as the scenery changed from close-up jagged cliffs in Montana, to straight road, fields of potatoes and cows in Idaho with mountains in the very far distance. It felt like the view was just getting better and better as we drove into Utah, with rolling red cliffs in the distance, and huge snowy peaks in the far distance. We camped just outside of Ogden on day 2 and drove through Salt Lake City on day 3. We stopped at some sport shops, a brewery called Epic Brewery, and a vegan diner called Vertical Diner. At the diner Tom had a bean and seitan burrito and I had a Philly cheese steak sandwich made with tempeh and nutritional yeast cheese sauce. The menu was delightful, and I highly recommend it to anyone. And, Epic was pretty great too. Salt Lake City has a law that beer must be no more than 4% at restaurants, grocery stores, and on tap at bars, but at breweries it can be more, only in single bottle sales. We bought five bottles, one of which was a sage beer. Tom opened it after I had eaten a cookie (s’more Oreo, mmmmm), so I didn’t care for that beer much. Had I drank it with tofurkey or something savoury, I may have enjoyed it more hehe.

Day 3 also involved driving to Grand Junction, Colorado, where we saw Shakey Graves, a musician that Tom and I have gotten into over the past year. He performed for free at an outdoor street festival in Grand Junction. Tom and I enjoyed vegetarian paninis at Café Sol, and dairy-free gelato from a local vender before the performance. We got lost on the way to the campsite that night, which was in the middle of the desert. I think both of us were a little apprehensive, as we saw cars in the distance, who were driving in the opposite direction. Finally, we found the site, which was supposed to be free, but was asking for $10. We paid it, only to find that the site was full. A nice couple, who were also sleeping in their vehicle, let us share their sit, which easily accommodated two parties. I had the best sleep that night, after having woken up from being cold the previous two nights. Anaconda and Ogden must have gone down to between 5-10*C at night, and the dessert felt warmer. While the days go up to between 25-30*C, nights get chilly.

IMG_0035

Day 4, we drove to Maple Canyon and climbed a few routes in the late afternoon. This place is incredible, like no other climbing place I have ever been. The cobblestone rock appears bubble-like, and gives a plethora of holds, which can be daunting, as they are not always as juggy as they appear. As I sit here in my campsite, sipping on coffee, bundled in my puffy winter jacket, I am surrounded by humungous cliffs that peak in bulges and towers, like the top of a castle tower. We are so close to the cliffs that we can return to our campsite for lunch, which is unique, compared to the typical 20-30 minute approach trail.

IMG_0086

IMG_0078

IMG_0058

I am feeling fortunate, happy, and excited to continue on this adventure. Here is a recipe of overnight oats that fuels us before a full day, inspired by a recipe from ohsheglows.com. It serves two, though I often have trouble finishing my serving. Tom usually helps me out, or I save it for a snack.

Ingredients

1 yellow banana, mashed
2 tbsp protein powder
¾ cup rolled oats
¼ tsp salt
1-2 tsp cinnamon
1-1 ½ cups non-dairy milk

Optional: almond butter, maple syrup, hemp hearts, chia seeds

The night before I want to eat this breakfast, I mix together the first six ingredients in a mason jar with a lid. The amount of milk depends on how liquid you like your oats the next day, but it should appear liquidy because the oats soak up the milk. Since the temperature here goes down so low, I just leave the oats out by our tent overnight, but at home I would put them in the fridge. The next day, I serve the oats with the optional toppings listed above. This morning I omitted the maple syrup, as I have found the oats sweet enough without.

I am eating these oats as I type this! It is definitely worth trying, as cold oats are waaaay better than they sound.

Carrot Cake Granola Bars

As summer comes to an end, and with a new school year about to begin, I am packing my things in Calgary to head back to Ottawa to start my Masters in Counselling Psychology. It has been one of the best summers ever, and in fact, one of the best years ever; I went to pastry school, worked in two bakeries (pies for four months, and bagels for four months), traveled around Argentina, and got to explore the beautiful west side of Canada. Taking a year off was such a great decision, and even though I am definitely not done with traveling, baking, or Western Canada, I am about to put these things on hold for two years. One adventure ends and another begins! 

Tom and I took 12 days to road trip from Calgary to Vancouver and back, stopping in Kelowna, Penticton, Vancouver, Squamish, and the Radium Hot Springs. We camped, wine toured, biked, swam, climbed, hiked, and visited with some very special friends: Keegan, Barah, Amanda, Barbara, Chuck, and Corinne. Definitely a wonderful way to end the summer. 

Before leaving for our trip, I made Vegan Carrot Cake Granola Bars to munch on on the road. 

Ingredients
2 cups quick or minute oats
1/4 cup flour
1/2 cup brown sugar
1 cup shredded carrots
1/2 cup unsweetened shredded coconut
1/2 tsp salt
1/2 tsp cinnamon
1/4 tsp nutmeg
2 tbsp ground flax seeds, mixed with 4 tbsp water
1 tsp vanilla extract
1/3 cup maple syrup
1/3 cup vegan margarine, or melted coconut oil
Optional: raisins, walnuts, hemp seeds

I mixed everything together in a bowl (starting with the dry ingredients and carrots, then adding the wet ingredients), and pressed the mixture firmly into an 8 x 8 square pan, greased and lined with parchment paper. I baked the granola bars at 350 degrees for 35-40 minutes. I let the pan cool for about an hour, then cut them into 8 granola bars and wrapped them individually. 

They made a delicious snack for the road, and taste just like carrot cake! It is best to keep them refrigerated, but not necessary. It was sad when a couple of them got wet on our trip because our ice bags in the cooler leaked onto them. Tom pointed out that I like to mourn my food whenever it goes bad, and can’t throw it away right away. Eventually I accept that the food cannot be saved and throw it out. 

I really like making my own granola bars, as it is way cheaper than buying them from the store ($5 for 6 bars?!?!), and I have a lot more options for flavours (again with the peanut allergy limiting my options). I will definitely make this recipe again. 

Adios Calgary!