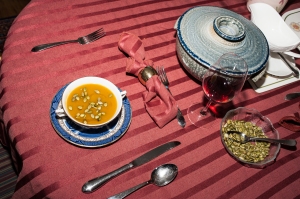
White Bean-ball Wedding Soup

Well, it’s “Monsoon June” here in Calgary. At least, it has been for the last couple weekends. I’ve been itching to use my new hiking boots and forwent a day trip to the mountains this Saturday because of rain. As such, a rainy day meal was in order. And, with company coming over, I thought I’d pull out a new recipe.

I’ve owned Thug Kitchen for a while now. It was given to me by my cousin  Leigh and her husband John for Christmas one year, and it is certainly time that I post about it.

The first noticeable thing about this cookbook is that it is written in a bossy and blunt tone of voice, using profanity in a humorous way; even the instructions of what to do (“eat like you give a f*ck, as the tagline says). Beyond this comical twist, the book has a lot of interesting recipes, and  how-to’s for basic plant-based eating, such as the ABCs of a good salad, rice/noodle bowls, and smoothies. It is a great cookbook for beginner vegan eaters, most certainly. It has some great looking soup and salsa recipes too that I am itching to try. And, the thing I really like about this cookbook is that it strays away from the stereotype of being vegan as a feminine or a hippie sort of thing, having a more macho vibe. I think this book can reach a different audience than say, Plant-Powdered Families by Dreena Burton.

OK, let’s get to it. I made the recipe called Wedding Soup with White Bean Balls and Kale.  I served it with a baguette, and it fed three of us, leaving enough leftovers for someone to have a lunch the next day. The bean-balls are great on their own too, which meant that we had more broth than bean-balls left over.

Here is my version of the recipe in the book. I changed some quantities and instead of a “no-salt all purpose seasoning” (which involved a google search to see what that is), I made up quantities for some other spices, which went well with the bean-balls.

Ingredients for the bean-balls
1 large onion, diced
3 cups of white beans (canellini or kidney), I used 3 small cans, (398 ml each)
1/2 cup bread crumbs (I used fresh bread crumbs that I made from the ends of bread and froze)
3 cloves garlic, minced
1/4 cup nutritional yeast
2 tbsp olive oil (I used a truffle olive oil, YUM)
1 tbsp soy sauce
1 tsp each dried thyme, basil, and oregano
1/4 tsp each onion powder, garlic powder, and paprika
1/2 tsp grated lemon zest

Ingredients for the soup
1 tsp cooking oil (grapeseed, canola, or olive)
2 carrots, chopped
2 ribs celery, chopped
3 cloves garlic, minced
1 cup small dried pasta (I used bow ties, but anything that size or smaller would work)
9 cups vegetable broth (I often thin out my broth with water to make the broth last longer)
1 tbsp freshly squeezed lemon juice
2 cups chopped kale (the recipe called for 4 cups but I thought it might be too much)
1/4 cup chopped parsley
1/4 tsp each salt and pepper

I started by preheating the oven to 400*F and preparing a large baking sheet with parchment paper on top.

In a large bowl I mashed the beans until they formed a paste with a small amount of chunks. I then added 1/4 cup of the diced onion (reserving the rest for the soup), and the rest of the bean-ball ingredients, stirring until combined. I formed the bean-balls into the size of golf balls, making a total of 26 balls. They could be slightly bigger or smaller too. I put the bean-balls in the oven for 25 minutes, flipping them after about 15 minutes.

20160625_181821

While the bean-balls were in the oven I started on the soup. I heated the oil in a large pot and cooked the onions, carrots, and celery all at once for 3-5 minutes. I added the garlic and let it saute for another couple minutes. I then added the broth and let it come to a boil. The pasta was added and cooked until still a tad al dente, as it will continue to soften as it sits in the soup. I turned off the heat and added the lemon juice, kale, parsley, salt, and pepper.

To serve, I placed 4 bean-balls in a bowl and added the soup on top. The bean-balls soften quite quickly, so I let everyone serve themselves so the soup didn’t sit too long before being consumed.

20160625_183221

This was a fun new recipe for me; I quite enjoyed making it. And, it was well received by all. It made a great lunch the next day, too!

That’s all for now. Thanks for reading 🙂

Stay tuned for some road trip adventures coming up! I’m not sure how often I will get to post, but I’d sure like to, as this is a great space for a travel blog.
Dehydrated Goodies: Powdered Veggie Stock and Date-Nut Chewies

Merry Christmas!

December can be such a busy month! I’ve been juggling two jobs while squeezing in time for getting into the holiday spirit and getting my Christmas shopping done. This year I bought my gifts with a theme in mind: hand-made and local. I bought lots of gifts at Market Collective, which is a fun event in Calgary that hosts local artists selling their creations. I also decided to make a couple things in my dehydrator, and I’d like to share them with you today.

I got these recipes from a book called Dry It – You’ll Like it! by Gen Macmaniman. I received it for Christmas one year, and it is a great guide for drying fruits, veggies, and herbs, and includes instructions for building your own dehydrator.

Dehydrating is fun, and a great way to save produce that is in season, or that may go bad before you have a chance to use it fresh. At Thanksgiving I dehydrated all the extra fresh herbs I had: sage, parsley, and thyme. I also made cran-apple fruit leather, and go absolutely cuckoo for dehydrated apples and bananas. In my opinion, having a dehydrator is perfect for anybody who likes experimenting in the kitchen, and who is looking to incorporate more raw foods in their diet. Check out this recipe for rosemary seed crackers from a previous post.

Please note that if you are considering buying a dehydrator, look at product reviews before purchasing, as the first one I had lasted only a month past the warranty date, and it looks like I’m not the only one that happened to. It’s also great to buy a dehydrator that you can control the temperature.

So, back to my little Christmas project. I made soup stock and date-nut chewies to include in my gifts to my family. Here is what I did:

Veggie Soup Stock
Yields around 20 tablespoons of powder, or 20 cups of stock (when added to 1 cup of boiling water per 1 tablespoons of stock)

Ingredients
2 medium tomatoes, sliced
4 celery stalks, cut into sticks (I also dehydrated the leaves)
2 cups mushrooms, sliced
2 large carrots, sliced into rounds
1/2 cup spinach

Note: You may use a wide variety of vegetables. The book suggests cabbage, carrots, celery, garlic, green beans, horseradish, mushrooms, mustard greens, onions, peppers, spinach, tomato, or watercress. I chose what I thought would go together nicely.

Directions
I placed all the vegetables in one layer on dehydrator sheets. I have four sheets, and all these veggies took two rounds of dehydrating to complete. They were dehydrated at 135*F for about 6 hours. Time may vary depending on how thick the vegetables are, how crowded the trays are, and how juicy the vegetables were to begin with. I removed the vegetables that felt completely dry, and continued to dehydrate the ones that were still damp. You can add more vegetables once there is room on the trays. To check the vegetables, remove the heat source and let the veggies cool down first. If it feels dry, it probably is.

Next, I placed all the dehydrated vegetables in a high-speed blender and blended until the vegetables were a powder. This took a couple minutes of blending. Be sure to let the blender rest before opening it, as the powder is very fine and smokes into the air.

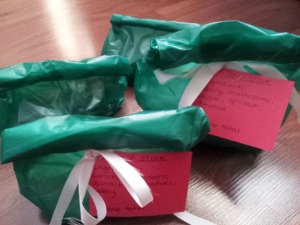
I divided the stock into two plastic baggies of 10 tbsp each, and added the keep-dry packets that come with sushi and other dry foods. I didn’t want the stock powder to be exposed to any moisture.

I wrote the following instructions on each baggie: “Mix 1-2 tbsp of stock with 1 cup of boiling water and let rest for about a minute. Add ground flaxseed to thicken, if desired. Use in soups, stews, and gravy.”

20151216_122650

Voila! Home-made powdered vegetable stock! Because it’s dry, it’ll last for a long time. Store it away from sunlight and moisture.

Date-Nut Chewies
Ingredients
3/4 cup oil (I used canola oil)
1/2 cup maple syrup
3 Macintosh apples (or another kind of apple), cut into pieces, skin on
2 tsp vanilla extract
1 cup rolled oats
1/3 cup sunflower seeds
2 cups pitted dates
1 cup raw almonds (recipe called for walnuts)

In my high-speed blender I mixed the oil, maple syrup, apples, and vanilla extract until smooth. Then, I added the rest of the ingredients and blended until smooth. The original recipe indicates that you should use ground oats and sunflower seeds, but I did not do this because of how powerful my blender is. Plus, I thought some chunks would be OK.

Next, I spread the mixture out on two dehydrator sheets, making them pretty thick (about 1/2 inch). I dehydrated them for around 6 hours, then cut them into small squares, separated them from each other, and continued to dry them for another 8 hours.

These chewies are a great snack that resembles an energy ball. I was expecting it to be more candy-like or cookie-like, but it definitely tastes like a healthy snack. The first one I tried, in all honesty, I wasn’t sure if I should give them as gifts, but after having a few more, the taste grew on me. This recipe made a lot, so I’m glad they turned out!

20151216_122802 (3)

Pumpkin Bisque and Mac n’ cheese

Thanksgiving has come and gone, and so has my cutie pie. He’s off to Kentucky for two months while I finish a 40 page paper and the rest of a busy semester. While he was here we made a vegan feast for my mom, stepdad, and stepbrother: all omnivores. The menu was as follows: pumpkin bisque, followed by festive vegan tart, mushroom gravy, cranberry sauce, roasted potatoes, roasted brussel sprouts, sourdough stuffing, and scalloped corn, followed by cranberry apple crisp for dessert. It was a success, I think.

Turns out that bisque means twice cooked. Who knew? The pumpkin bisque requires roasting the pumpkin, followed by melanging it in a soup. I think I managed to make a trisque (haha) because later in the week I used the soup to make pumpkin macaroni and cheese. It was so good.

The recipe for the bisque comes from my favourite plant-powered cookbook, Crazy Sexy Kitchen. I am slowly cooking my way through it. By the way, great gift for any foodie, unless they really hate veganism or healthy food. Also, keep in mind that when I post recipes from cookbooks, I often use slightly different ingredients, so you should still check out the original if you are interested.

I doubled this recipe, which was totally worth it, and fed 5 on thanksgiving, 5 lunches, and still had enough for mac n’ cheese.

Ingredients for the bisque
1 tbsp oil
2 cups fresh pumpkin, or half a medium cooking pumpkin (will explain)
1 medium white onion, diced
3 or 4 shallots, diced
5 cloves of garlic, oven roasted (will explain)
3 cups veggie stock
1 1/2 tbsp maple syrup
1/2 tsp cinnamon
1/4 tsp cayenne
1/4 cup sherry wine
1/2 tsp salt
Pepper to taste

To roast the pumpkin I cut it in half and took out the guts. The seeds were reserved for toasting later. I greased a cookie sheet and placed the pumpkin face down on it, then roasted it at 400*F for about 45 minutes to an hour. By inserting a fork it’s easy to tell when to take it out – if the fork goes in easily, it’s done.

Once the pumpkin was cooled, I cut it into smaller slices and used a fish de=boning knife to scrape the skin away from the pumpkin meat.

Another crucial step is to roast the garlic. At 400*F I placed five cloves of garlic in a tinfoil wrapped ball, having drizzled a bit of olive oil inside. I roasted the garlic for about 20 minutes. When it was done, it looked slightly brown when I opened up the foil.

Now the soup begins. I cooked the onion and shallots in oil until translucent, then added the rest of the ingredients. Using a hand blender, I pureed the soup until it was smooth. A blender would also do; a Vitamix would be superb. All that was left was to heat up the soup and serve with pumpkin seeds on top. Note that I did not used the pumpkin seeds that I roasted from the pumpkin, but rather used a different brand of store-bought pumpkin seeds. I found that the ones I made got too chewy in the soup (taste test!).

FX7_9464 (2)

Now for the mac n’ cheese….

Ingredients for pumpkin macaroni and cheese
2 cups pumpkin bisque
3 cups dry macaroni noodles
1 tbsp vegan margarine
1 tbsp flour
1/4 tsp onion powder
1/4 cup nutritional yeast

1 tbsp vegan margerine
1/2 cup breadcrumbs

I cooked the pasta until al dente and drained it, letting cool water pass over it to stop the cooking. In a sauce pan I melted 1 tbsp vegan margerine and made a roux with the flour (this involved whisking the flour with the butter and cooking it slightly, until a thick paste forms and bubbles). I added the pumpkin bisque and the rest of the ingredients, and whisked it until it came to a boil, letting it boil for a few minutes. The soup thickened up.

I put the cooked macaroni noodles into the sauce pan and mixed it until all the noodles were covered. I then transferred the noodles into a greased casserole dish.

In a small bowl I melted the other tablespoon of vegan margarine and then mixed in the breadcrumbs. I topped the casserole dish with the breadcrumb mixture, evenly spreading it over the macaroni. I baked the casserole for 20 minutes at 350*F with the lid on for most of it, but took the lid off and broiled it for a few minutes at the end.

I love pumpkin so much , so these dishes were a treat.

20141017_185331

Split Pea Soup

You HAVE to make this. Seriously, it is so delicious.

I got the recipe from Kris Carr’s Crazy Sexy Kitchen. Hers has seaweed (dulse) and kale in it, but I left that out to make it more traditional. Not only do I love split pea soup to begin with, but the red pepper flakes and nutritional yeast gave it some punch.

Ingredients
2 tbsp olive oil
1 onion, diced
4 garlic cloves, minced
3 celery ribs, diced
2 carrots, diced
1 1/2 cups dried split peas
6 cups vegetable stock
2 tbsp fresh thyme
1/4 cup fresh parsley, chopped
3 tbsp nutritional yeast
1/2 tsp salt
1/2 tbsp pepper
1/2 tsp red pepper flakes

First, I cooked the onion pieces in the oil for about 5 minutes, until they were translucent and slightly browned. Next, I added the garlic, celery, and carrots, and cooked for a few more minutes to lightly sautee them. After adding the split peas, vegetable stock, thyme, parsley, nutritional yeast, salt, pepper, and red pepper flakes, I let the soup cook for 45-50 minutes, stirring it occasionally. Voila! I served the soup with whole grain ciabatta bread toasted in the oven on broil for a couple minutes.

If you are interested in the dulse and kale addition, just add 1 1/2 cups shredded kale and 1/4 cup whole-leaf dulse seaweed, ripped into 1-inch pieces, and allow them to steam in the soup for 5 minutes before serving. The recipe also says that you can add 1 tsp of smoked paprika instead of the dulse. While I thoroughly enjoyed the soup without these additions, I’m sure they would be delicious too.

Image