A special shout out goes to my Auntie Anne, who sent me a cookbook in the mail called Eat Raw, Eat Well by Douglas McNish. It was a lovely surprise to get this cookbook, as I did not know she was sending it, and I had never heard of the book. The recipes look absolutely delicious, and I finally made one. It’s called Layered Zucchini Lasagna in the book, and I made it with some slight variations. The biggest changes I made were in quantities (I halved most of the sauces), and I added or changed ingredients here and there. Here is what I did.
Ingredients for Cashew Ricotta Cheese
2 cups raw cashews, soaked for 30 minutes
Juice from 1/2 lemon
1/2 yellow or red pepper (I used yellow)
1/2 cup water
1 clove garlic, minced
3/4 tsp dill weed
1 tbsp nutritional yeast
1/2 tsp salt
Ingredients for Marinara Sauce
2 tomatoes, quartered and seeded (push out the excess liquid and seeds)
2 tbsp olive oil
1/2 tsp salt
1/4 cup fresh basil
1/2 tsp cayenne powder
1 tbsp chia seeds
Ingredients for Pesto
1/8 cup lemon juice
1 clove garlic, minced
1/2 tsp salt
pepper
1/2 cup fresh basil
1 cup spinach
1/4 cup raw walnuts
1/8 cup flax oil (or olive oil)
Ingredients for Parmesan Cheese
Handful of raw almonds
3 tbsp nutritional yeast
Ingredients for Assembling the Lasagna
2 medium-sized zucchini
1 tbsp olive oil
salt and pepper
This whole dish requires a good food processor or a Vitamix. A tip I have is to add ingredients one by one so that the blending is easy. I always started with garlic and liquid, and ended with the most solid ingredient. This all depends on how good one’s mixer is.
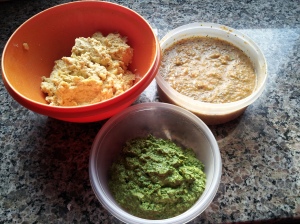
First, I made the cashew cheese by blending all the ingredients (reserving half of the cashews) in a food processor until smooth,. I added the rest of the cashews last and blended again. I did this to have some of the cashews remain chunky. I reserved the cheese in a container and put it in the fridge.
Next, I made the marinara sauce by blending all of the ingredients, except the chia seeds, in the food processor. I stirred in the chia seeds last. I reserved the sauce in a container and put it in the fridge.
Then I made the pesto. I blended all the ingredients, except the flax oil, all at once in the food processor. I added the flax oil little by little and blended until smooth.I put the pesto in a container and reserved it in the fridge.
The parmesan cheese is even easier. I pulsed the almonds and nutritional yeast in a food processor until the almonds became a chunky meal. It is important not to over-blend, as the almonds can start to turn into a butter.
To assemble the lasagna, I used a mandolin (thanks to Tom for that birthday gift) to cut the zucchinis length-wise, very thin. I made about 9 sliced. I lay out a piece of parchment paper and drizzled olive oil on top, then put the sliced zucchini on top and drizzled some more olive oil. I wanted the zucchini to be lightly coated, not soaked. I put salt and pepper on top and let them sit for ten minutes.
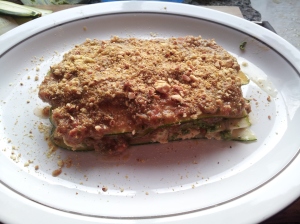
Next, I placed three pieces of sliced zucchini on a large dish, side by side. I layered the ricotta cheese, pesto, and marinara sauce, in that order. The cheese took a bit of time to spread without moving the zucchini. I then layered three more pieces of zucchini on top, repeated the layer of sauces, then topped the lasagna with a final layer of zucchini. I added an extra layer of marinara sauce on top, and sprinkled a generous coating of the parmesan cheese on top. I let the lasagna sit for about an hour before eating, which lets the noodles soften and allows the flavours incorporate.
Voila! I was pleasantly surprised with this recipe. It was delicious and full of flavour. I noticed that water starts to come out of it after an hour, and even more so when eaten as leftovers. It’s probably better made fresh, but we’ll see tomorrow!


